Network Discovery with Nmap and Netdiscover
Network discovery represents an important phase in the Information Gathering activity: it is the process of identifying live hosts on the network. This means that its purpose is not to find all possible informations about the targets (like open ports or vulnerabilities), but just to understand their logical location inside the network. Mapping targets is useful to model network infrastructure.
Nmap
Nmap is the most famous and complete tool for network discovery and scanning: it is considered the “Swiss army knife” of network Security tools and it can be used to perform a large variety of tasks.
Installation
If you are using Kali Linux, Nmap is already part of your arsenal. Otherwise you can install it from package repositories by using apt-get install nmap or yum install nmap or similar commands depending on your Linux distro. You can even download the latest release from https://nmap.org/download.html.
Usage
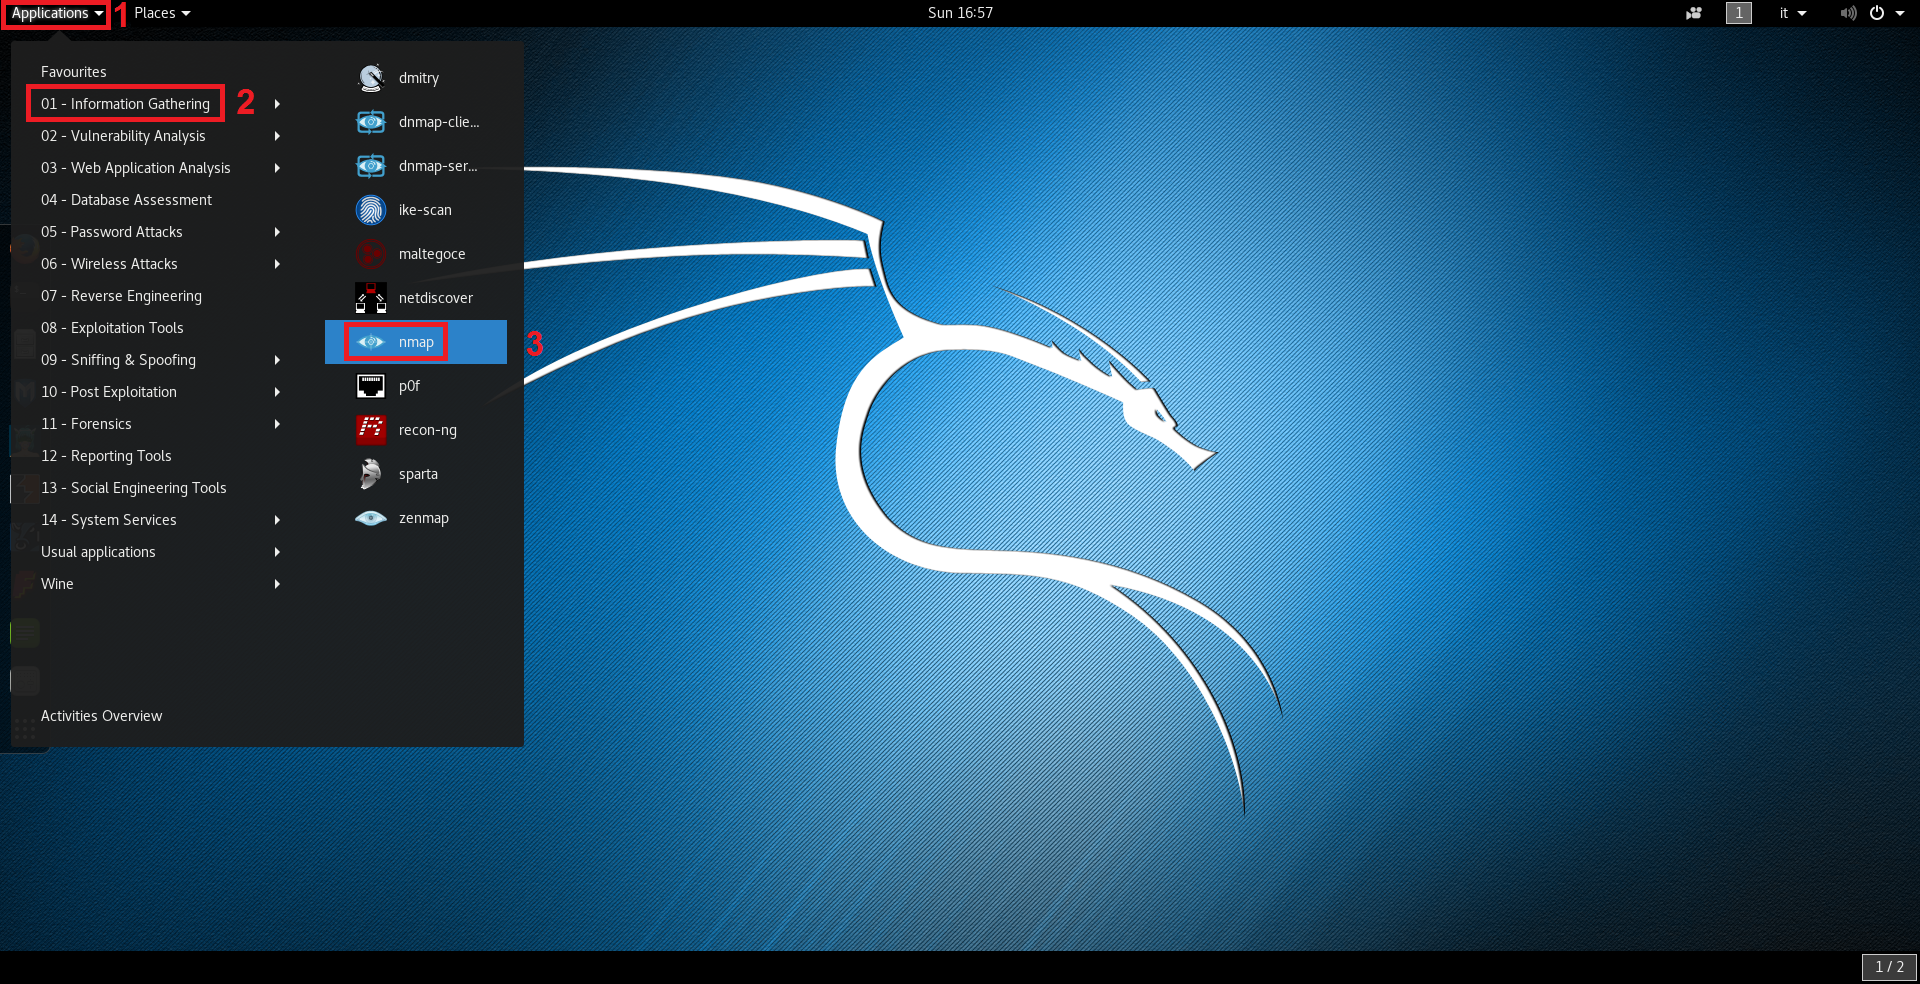
In Kali Linux, Nmap can be started by navigating in the applications menu by clicking on Applications > Information Gathering > nmap like shown in the following image:
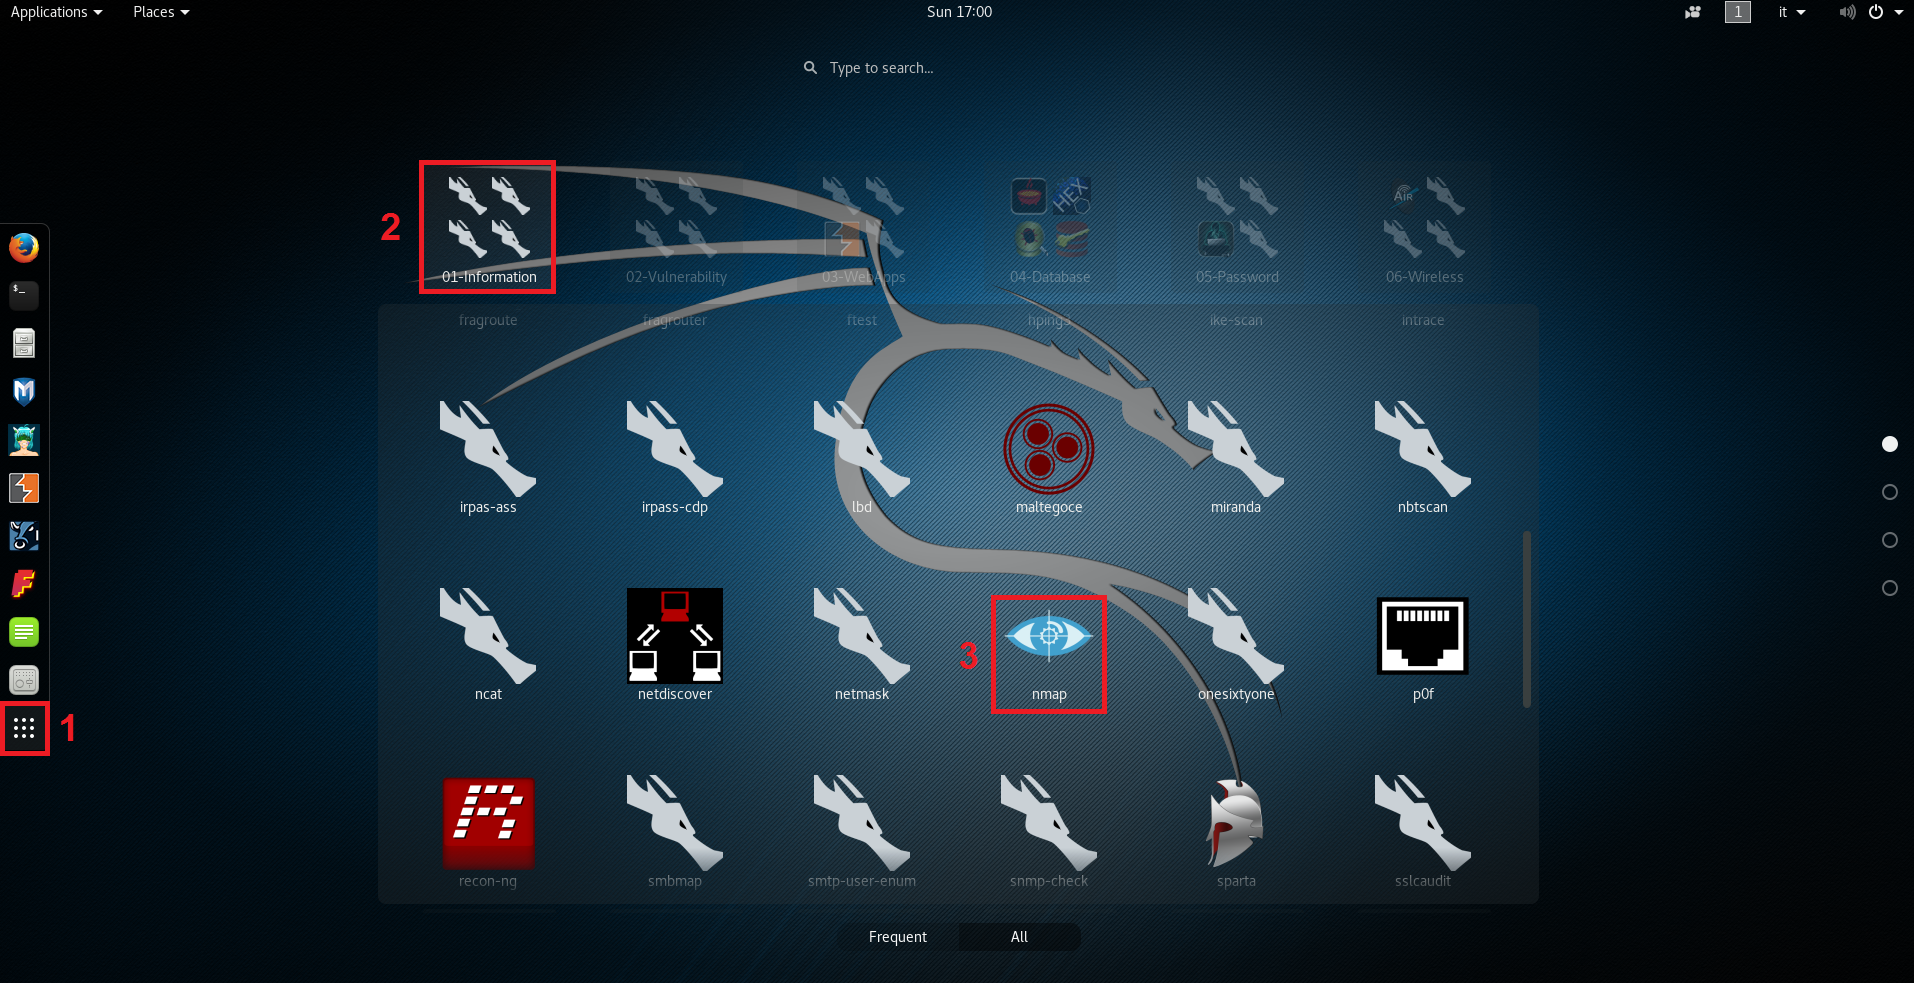
Same thing can be done by clicking on the “Show application” menu:
Another possibility is launching it by simply opening the Terminal and typing nmap. In any case, we are prompted with tool version and usage instructions:
root@kali:~# nmap
Nmap 7.25BETA2 ( https://nmap.org )
Usage: nmap [Scan Type(s)] [Options] {target specification}
TARGET SPECIFICATION:
  Can pass hostnames, IP addresses, networks, etc.
  Ex: scanme.nmap.org, microsoft.com/24, 192.168.0.1; 10.0.0-255.1-254
  -iL <inputfilename>: Input from list of hosts/networks
  -iR <num hosts>: Choose random targets
  --exclude <host1[,host2][,host3],...>: Exclude hosts/networks
  --excludefile <exclude_file>: Exclude list from file
HOST DISCOVERY:
  -sL: List Scan - simply list targets to scan
  -sn: Ping Scan - disable port scan
  -Pn: Treat all hosts as online -- skip host discovery
  -PS/PA/PU/PY[portlist]: TCP SYN/ACK, UDP or SCTP discovery to given ports
  -PE/PP/PM: ICMP echo, timestamp, and netmask request discovery probes
  -PO[protocol list]: IP Protocol Ping
  -n/-R: Never do DNS resolution/Always resolve [default: sometimes]
  --dns-servers <serv1[,serv2],...>: Specify custom DNS servers
  --system-dns: Use OS's DNS resolver
  --traceroute: Trace hop path to each host
...............................................................................
EXAMPLES:
  nmap -v -A scanme.nmap.org
  nmap -v -sn 192.168.0.0/16 10.0.0.0/8
  nmap -v -iR 10000 -Pn -p 80
SEE THE MAN PAGE (https://nmap.org/book/man.html) FOR MORE OPTIONS AND EXAMPLES
There is a huge list of parameters through which it is possible to perform a great quantity of activities: host discovery, port scanning, service/version detection, OS detection, Firewall/IDS evasion and spoofing, running scripts using Nmap Scripting Engine (NSE) and so on (above only HOST DISCOVERY options are reported).
Host discovery
In this article, we focus on host discovery techniques. We can list hosts belonging to a certain subnet by setting the “-sL” switch; this can be helpful to check the IP addresses belonging to that subnet. The range can be expressed, for example, using the Classless Inter-Domain Routing (CIDR) notation:
root@kali:~# nmap -sL 192.168.1.0/24

Starting Nmap 7.25BETA2 ( https://nmap.org ) at 2016-09-18 15:37 CEST
Nmap scan report for 192.168.1.0
Nmap scan report for 192.168.1.1
Nmap scan report for 192.168.1.2
Nmap scan report for 192.168.1.3
.....................................................................
Nmap scan report for 192.168.1.253
Nmap scan report for 192.168.1.254
Nmap scan report for 192.168.1.255
Nmap done: 256 IP addresses (0 hosts up) scanned in 4.26 seconds
Keep in mind this does not send any packet to the hosts: it only makes a list based on the specified network; Nmap by default always tries to do a reverse DNS resolution on the hosts to discover their names.
Instead, if we want to perform a network discovery, we can use the “-sn” switch; this option takes as input an IP address or a range and checks if a host is online or not by sending Address Resolution Protocol (ARP) requests or Internet Control Message Protocol (ICMP) requests depending on the target subnet location (local or remote).
In fact referring to the ISO/OSI stack model, since ARP is a layer 2 protocol, it cannot discover remote systems due to its non routable nature; in that case Nmap automatically switches to ICMP requests which are instead layer 3.
Everytime it is possible, i.e. for hosts on the local subnet, it is better to use ARP discovery since it is faster and highly relayable (ICMP requests can be filtered by Firewalls).
root@kali:~# nmap -sn 192.168.1.0/24

Starting Nmap 7.25BETA2 ( https://nmap.org ) at 2016-09-18 16:25 CEST
Nmap scan report for 192.168.1.1
Host is up (0.0011s latency).
MAC Address: 00:11:22:33:44:55 (Router manufacturer)
Nmap scan report for 192.168.1.100
Host is up (0.00015s latency).
MAC Address: 00:0C:29:59:72:BC (VMware)
Nmap scan report for 192.168.1.201
Host is up (0.00012s latency).
MAC Address: 00:0C:29:A2:56:2B (VMware)
Nmap scan report for 192.168.1.10
Host is up.
Nmap done: 256 IP addresses (4 hosts up) scanned in 3.06 seconds
Of course this activity is more intrusive than just listing hosts, but it is a necessary step to understand which machines are up or not.
We can see that in the network defined by the range 192.168.1.0-255 there are 4 hosts that responded to our ARP requests. For every host discovered it is reported its Media Access Control (MAC) address. This value is made by 6 couples of numbers separated by the colon symbol and represents the host in a unique way since refers to the machine network card (the first three couples indicate the manufacturer).
Analizying network packets
We can check the discovery activity with a network packet analyzer/sniffer like Wireshark: in Kali, Applications > Sniffing & Spoofing > wireshark.
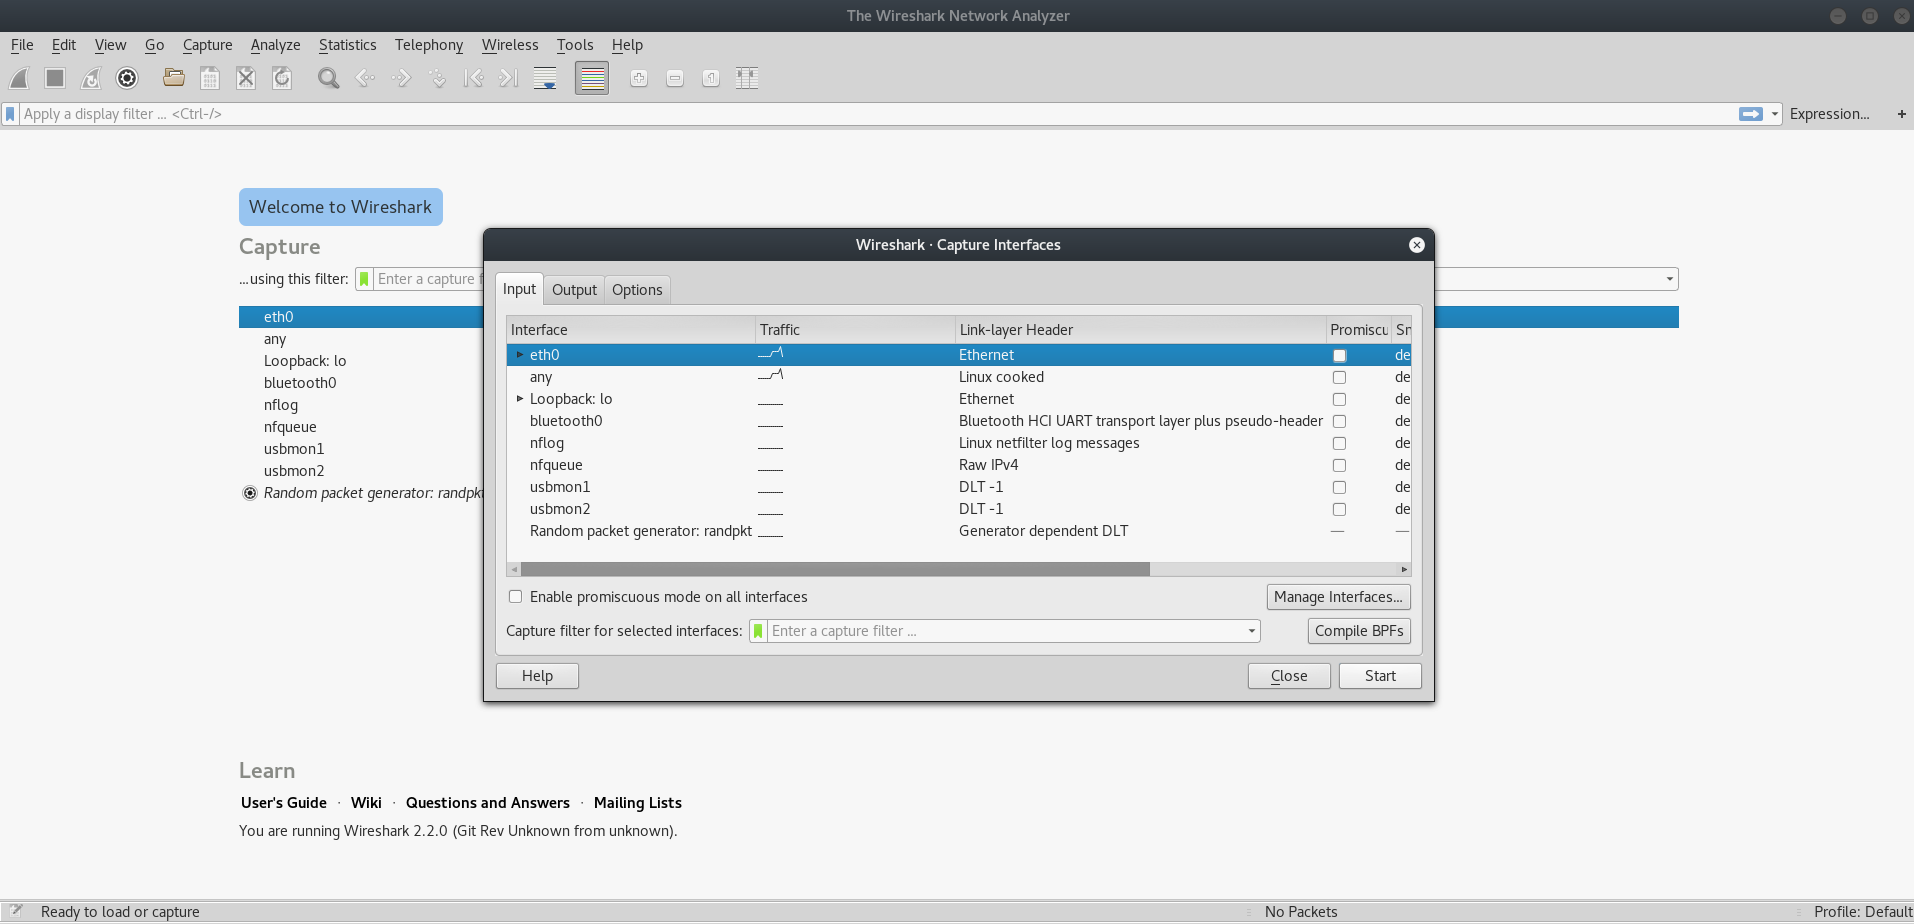
Once the tool is launched we need to set the network interface we want to listen on, in this case eth0; this can be done by clicking on Capture > Options and then selecting the interface:
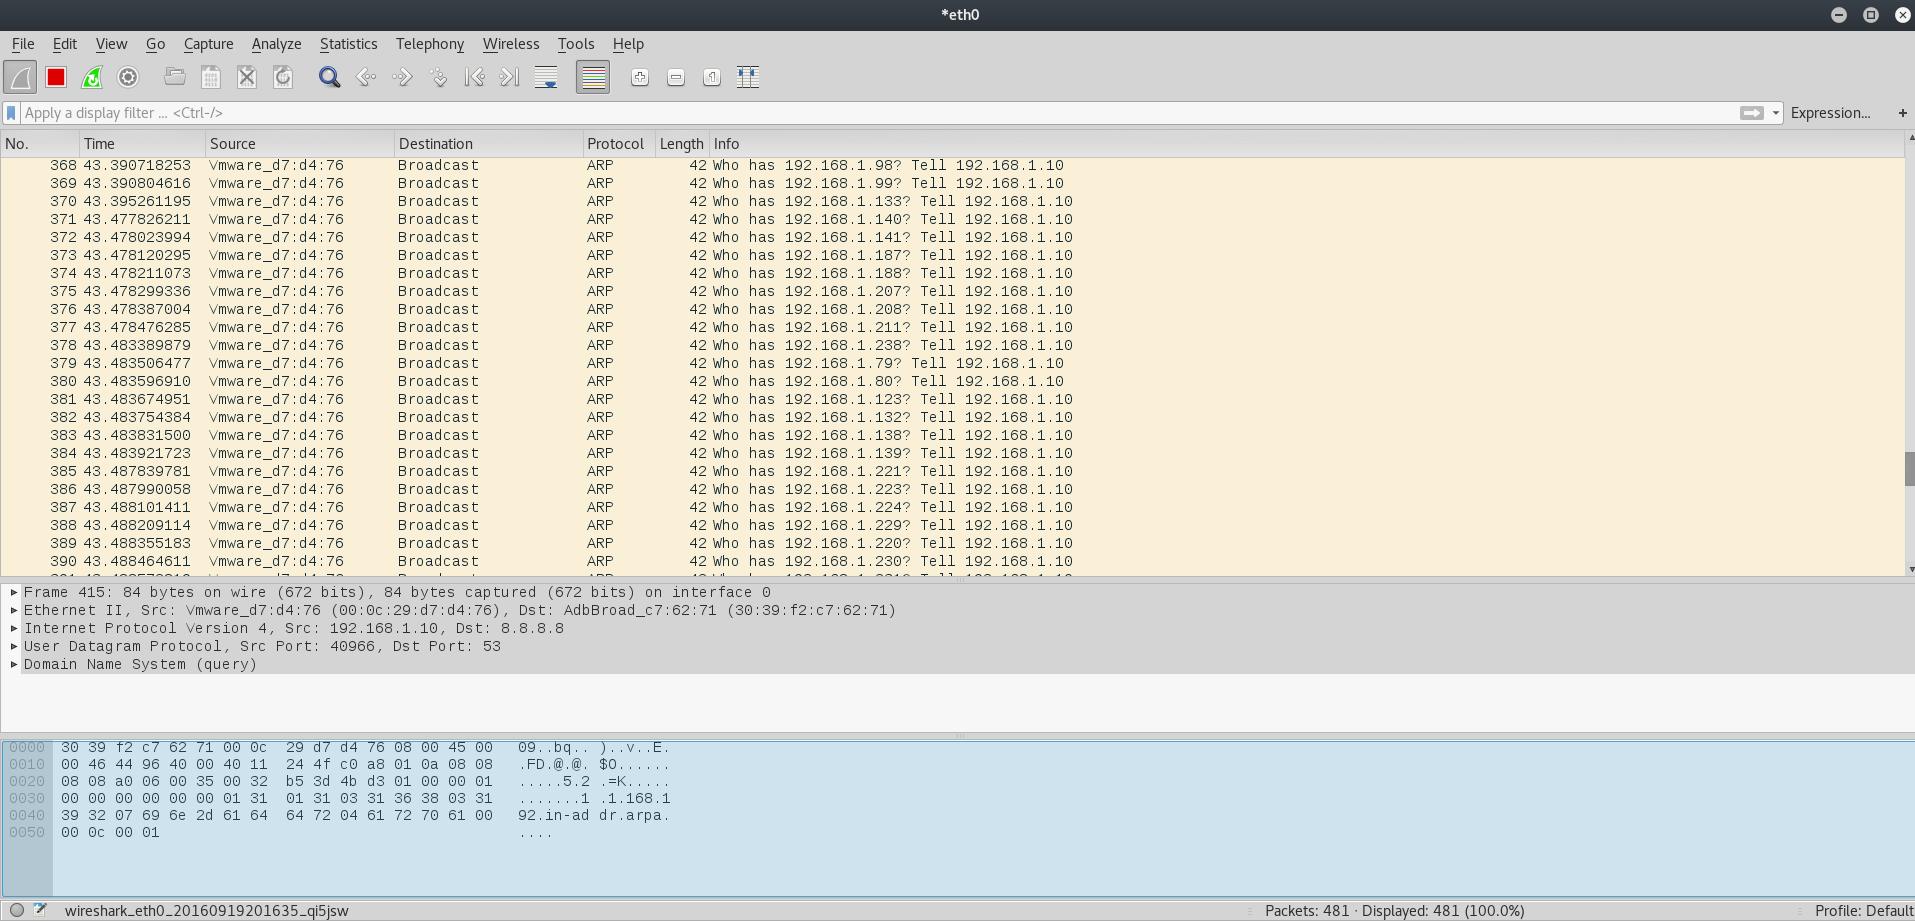
Clicking on the Start button launches the packets capture. If now we restart the above Nmap scan we can check its activity in Wireshark main window. The following image shows, as expected, broadcast ARP requests made to the entire range 192.168.1.0-255 by the Kali machine which has IP address 192.168.1.10:
If a machine has the requested IP address, it will respond declaring its MAC address. Data collected in this way are saved in the ARP cache, which is nothing more than a table containing the list of IP addresses with their associated MAC address.
Netdiscover
Netdiscover is my preferred tool for local network discovery: it is pretty fast and offers the possibility to perform both active and passive ARP reconnaissance.
Installation
If you are using Kali Linux, you have it already available. Otherwise, if for example you are using Ubuntu, you can install it from package repositories by using apt-get install netdiscover . You can even download the latest release from https://sourceforge.net/projects/netdiscover/.
Usage
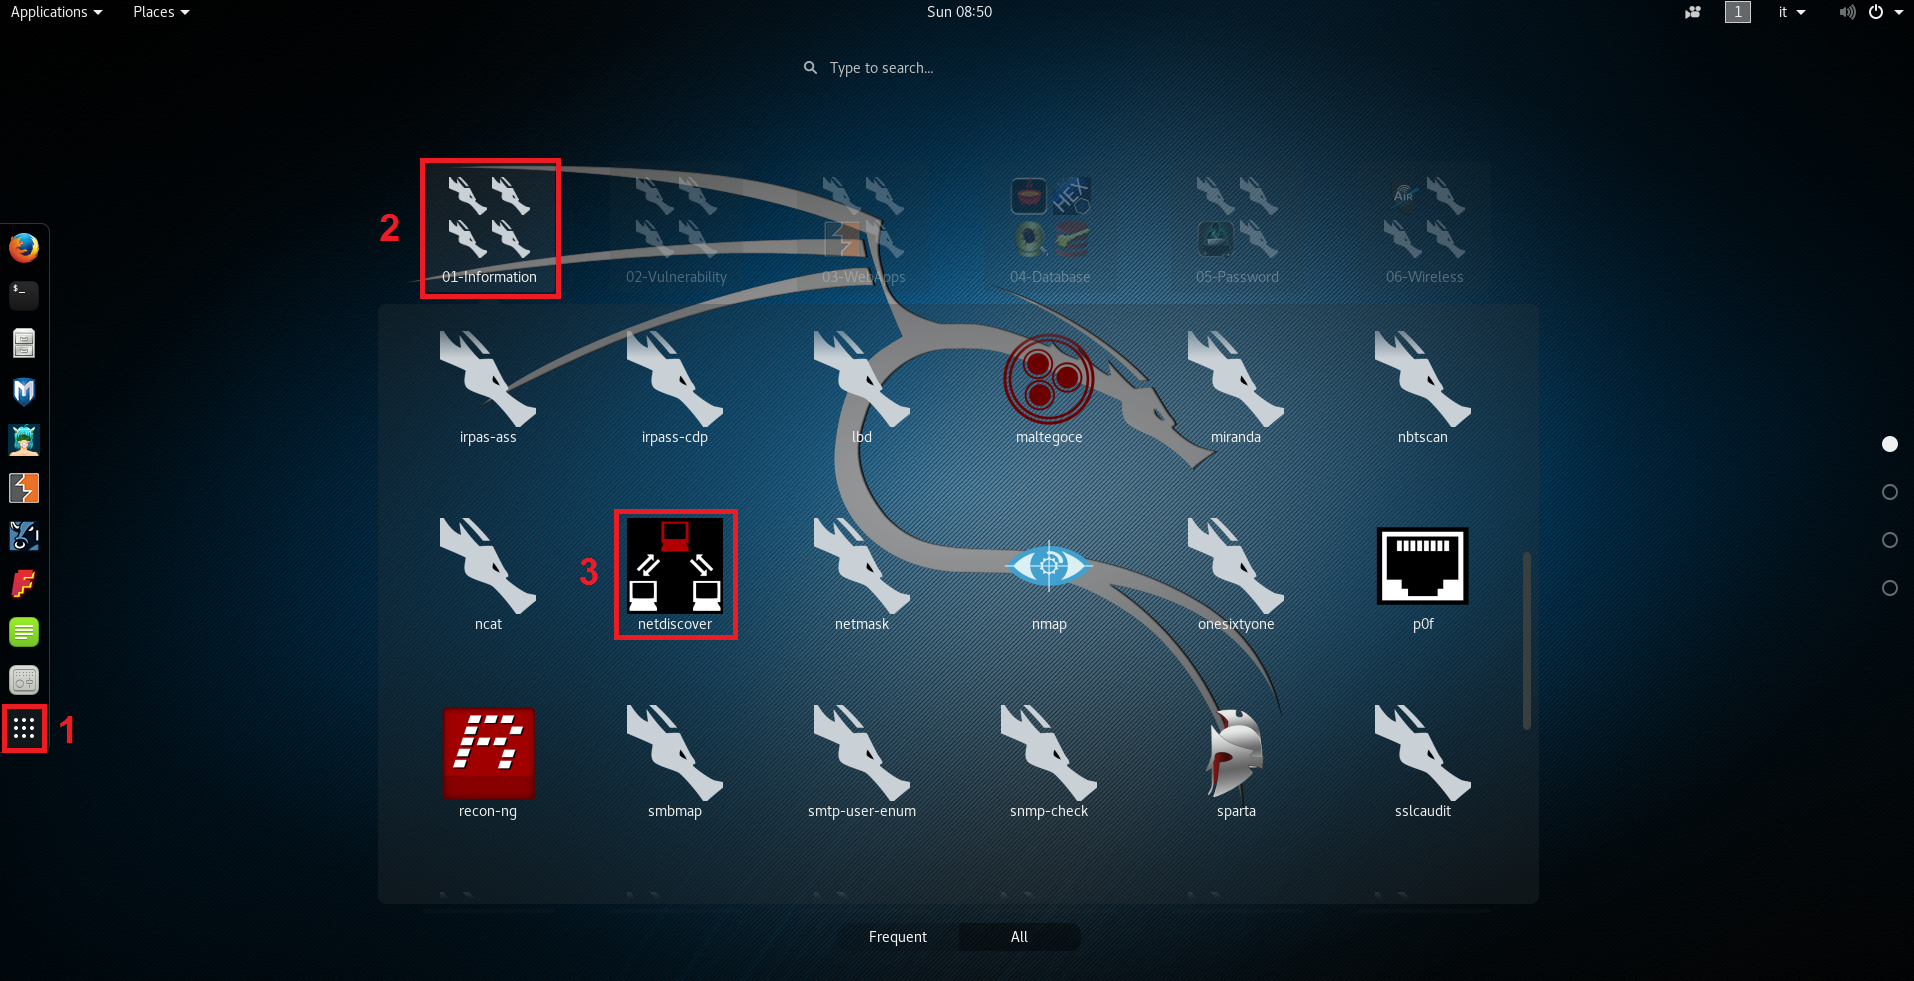
In Kali Linux, Nmap can be started by navigating in the applications menu by clicking on Applications > Information Gathering > netdiscover like shown in the following image:

Same thing can be done by clicking on the “Show application” menu:
This opens up a Terminal with usage instructions:
Netdiscover 0.3-pre-beta7 [Active/passive arp reconnaissance tool]
Written by: Jaime Penalba <jpenalbae@gmail.com>

Usage: netdiscover [-i device] [-r range | -l file | -p] [-m file] [-s time] [-n node] [-c count] [-f] [-d] [-S] [-P] [-c]
  -i device: your network device
  -r range: scan a given range instead of auto scan. 192.168.6.0/24,/16,/8
  -l file: scan the list of ranges contained into the given file
  -p passive mode: do not send anything, only sniff
  -m file: scan the list of known MACs and host names
  -F filter: Customize pcap filter expression (default: "arp")
  -s time: time to sleep between each arp request (milliseconds)
  -n node: last ip octet used for scanning (from 2 to 253)
  -c count: number of times to send each arp reques (for nets with packet loss)
  -f enable fastmode scan, saves a lot of time, recommended for auto
  -d ignore home config files for autoscan and fast mode
  -S enable sleep time supression between each request (hardcore mode)
  -P print results in a format suitable for parsing by another program
  -N Do not print header. Only valid when -P is enabled.
  -L in parsable output mode (-P), continue listening after the active scan is completed

If -r, -l or -p are not enabled, netdiscover will scan for common lan addresses.
They are pretty explanatory; an example of active ARP reconnaissance is this one:
root@kali:~# netdiscover -r 192.168.1.0/24
 Currently scanning: Finished!   |   Screen View: Unique Hosts
 4 Captured ARP Req/Rep packets, from 4 hosts.   Total size: 240
 _____________________________________________________________________________
   IP            At MAC Address     Count     Len  MAC Vendor / Hostname
 -----------------------------------------------------------------------------
 192.168.1.1     00:11:22:33:44:55      1      60  Router Manufacturer
 192.168.1.100   00:0c:29:59:72:bc      1      60  VMware, Inc.
 192.168.1.200   00:0c:29:3a:cb:5b      1      60  VMware, Inc.
 192.168.1.201   00:0c:29:a2:56:2b      1      60  VMware, Inc.
As reported the tool scanned the subnet 192.168.1.0/24 by sendind ARP request on the network and finding out the same four hosts seen before.
If we want to maintain a low profile to avoid getting caught, we can set up a passive ARP discovery; in this case we just sit sniffing the network traffic:
root@kali:~# netdiscover -p
 Currently scanning: (passive)   |   Screen View: Unique Hosts
 10 Captured ARP Req/Rep packets, from 4 hosts.   Total size: 600
 _____________________________________________________________________________
   IP            At MAC Address     Count     Len  MAC Vendor / Hostname
 -----------------------------------------------------------------------------
 192.168.1.201   00:0c:29:a2:56:2b      5     300  VMware, Inc.
 192.168.1.1     00:11:22:33:44:55      2     120  Router Manufacturer
 192.168.1.200   00:0c:29:3a:cb:5b      1      60  VMware, Inc.
 192.168.1.100   00:0c:29:59:72:bc      2     120  VMware, Inc.
Of course this will take longer w.r.t. the active scan, but it is difficult to detect since we are just listening for ARP requests and responses on the network made by other systems.
Conclusions
We have seen how to use Nmap and Netdiscover for discovering live hosts inside a network. They are both useful tools even if Nmap is better for a port scanning and service detection purpose (in a forthcoming article we will take a look at how it can be used to perform these tasks).